Introduction to Ktor

Ktor is a lightweight and flexible web framework for Kotlin, designed to build scalable and high-performance web applications. Its popularity lies in its ease of use and extensibility, allowing developers to quickly develop and deploy applications using a concise and intuitive syntax. Ktor also offers a comprehensive set of features, including support for asynchronous programming, routing, templating, and HTTP clients and servers. Furthermore, Ktor’s compatibility with different environments and systems, such as Android and cloud platforms, has made it a go-to choice for many Kotlin developers.
In this article, we will learn the basics of Ktor and create a simple backend application using Ktor framework.
Getting Started
Table of contents
- What is Ktor
- Why Ktor
- Creating a Ktor application
- Understand the project structure
- Create your first Ktor application
- Ktor client on Android
What is Ktor
Ktor is an open-source framework built by JetBrains for building asynchronous servers and clients using Kotlin programming language.
Ktor is popular because it offers a lightweight and flexible approach to building web applications, with a focus on extensibility and modularization. It allows developers to build web applications quickly and easily, using Kotlin’s concise syntax and functional programming features. It is designed to be highly scalable and performant, making it suitable for building high-traffic web applications. It supports a variety of deployment options, including running on traditional servers, containerized environments, and serverless platforms like AWS Lambda.
Why Ktor
- Kotlin and Coroutines
Kotlin and Coroutines in Ktor provides a modern and efficient way to build web applications. Kotlin’s expressive syntax and interoperability with Java makes it easier to write and maintain code, while Coroutines enables developers to write efficient and scalable asynchronous code. - Lightweight and Flexible
Ktor is built using a set of small, focused libraries that can be used independently or together, depending on the needs of the project. It uses Kotlin’s powerful features like extension functions and DSLs (domain-specific languages) to provide a concise and expressive syntax that allows developers to structure their applications freely. - Interoperable
Ktor is highly interoperable with Java since it built on Kotlin. Ktor can easily integrate with existing Java code and libraries, allowing developers to use the framework in their existing Java projects or with other Java-based frameworks like Springboot. - Migration
Kotlin enables a smooth transition for large codebases from Java to Kotlin by supporting progressive migration. Developers can write new code in Kotlin while retaining older parts of their system in Java. - Tooling support
The strong tooling support of Ktor ensures that developers can easily create, manage, and deploy Ktor applications using their preferred tools and workflows. The tight integration with IntelliJ IDEA, in particular, provides a smooth and efficient development experience for Ktor users. - Community support
Ktor has a strong and supportive community that is dedicated to helping developers learn and use the framework effectively. In addition to the official documentation, the Ktor community also offers support through various channels such as GitHub, StackOverflow, and Reddit.
Creating a Ktor application
There are multiple ways to start your Ktor projects based on the requirements. You can use IntelliJ IDEA Ultimate to create a Ktor project. If you are interested in open-source development, you can use the community version where the web-based project generator can be used to generate a Ktor project. You can also create a new Ktor application via start.ktor.io and add the required functionality via IntelliJ IDEA.
In this section, we will use the online Ktor Project Generator tool to create a project.
- Open https://start.ktor.io/ link in your browser.
- Provide a valid project name (Eg: ktor-sample).
- User can see the default project configurations by clicking on the adjust project settings link.
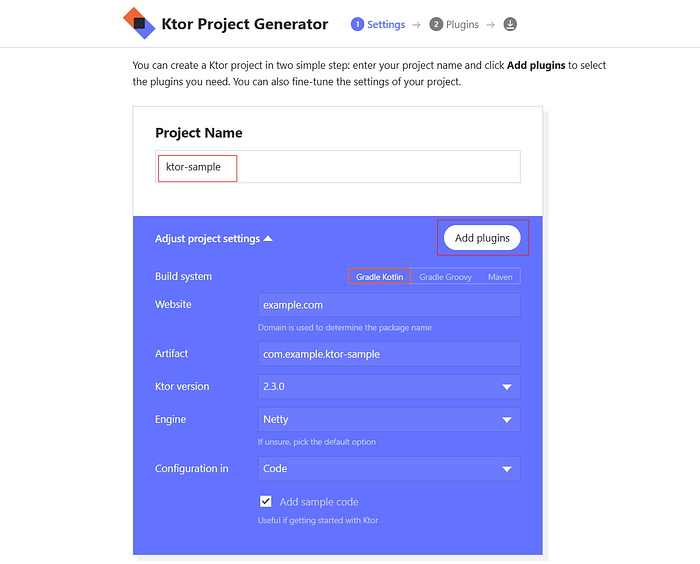
- Project Name: The name of the project
Build System: The build system to build the project.
Website: The website use to generate project artifact.
Artifact: Read-only generated via the Website you entered.
Ktor Version: Used to specify the version of Ktor.
Engine: Core part used to run the server.
Configuration in: Represents the locations to store server variables.
Add Sample code: Used to add some dummy code to the project. - In this demo, the default project configurations will be used.
- Click on Add plugins buttons to add some features such as Content Negotiation, kotlinx.serialization, Default Headers and Routing.
- kotlinx.serialization: ContentNegotiation allows the users to use content converters provided by the kotlinx.serialization library. This library supports JSON, CBOR, ProtoBuf, and other formats.
- Routing: Routing is a plugin that is installed into an application to simplify and structure the page request handling. It provides a structured way to handle incoming HTTP requests and generate corresponding responses. With Ktor routing, developers can define routes that match specific request URLs and methods, and then handle these requests with custom logic.
- Click on Generate Project to generate the Ktor project.
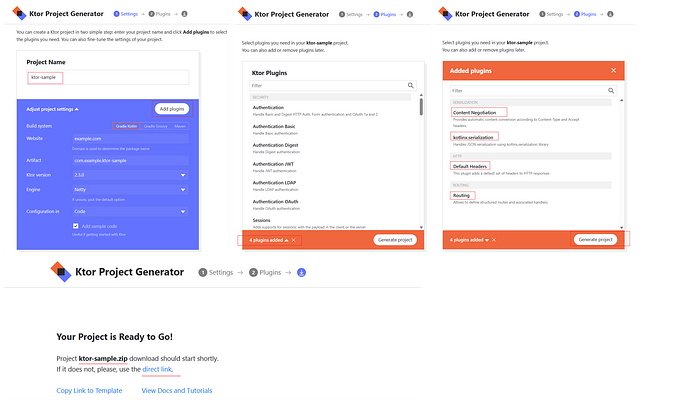
- Download and extract the [project-name].zip (Eg: ktor-sample.zip) file.
- Open it in IntelliJ IDEA community edition and wait for the Gradle sync completion.
- Click on the play icon (▶️) to run the ktor server.

- The Run window shows a message like “Responding at http://127.0.0.1:8080” if the server is running successfully.

- The “Hello World!” message will be shown if you hit the http://127.0.0.1:8080 URL on the browser.

Understand the project structure
The project structure of a Ktor application is fairly flexible and can be customized to meet the needs of the developer. However, there are some common elements that are often included in a Ktor project structure:
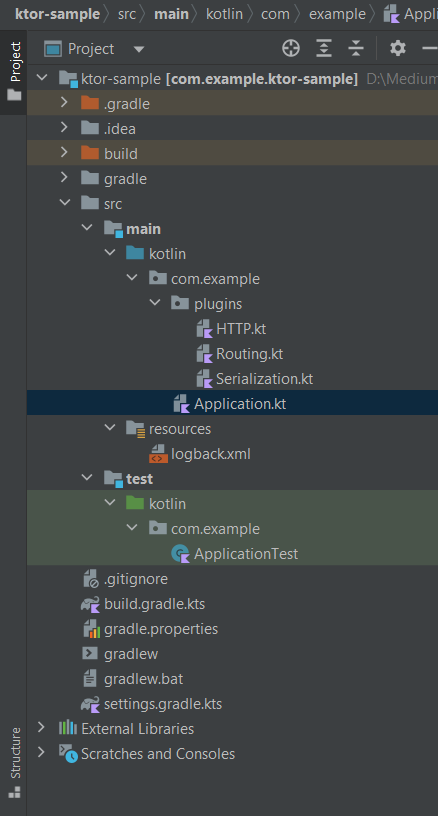
srcdirectory: This directory typically contains the source code for the application. It may be further divided into subdirectories based on the modules or features of the application.resourcesdirectory: This directory typically contains any non-source files that are required by the application, such as configuration files, static assets, or templates.testdirectory: This directory typically contains unit and integration tests for the application.build.gradle.ktsorpom.xml: These files contain the build configuration for the application, including dependencies, plugins, and other settings.application.conf: This file contains the configuration settings for the Ktor application, such as server settings, logging, and security settings.Application.kt: This file contains the main entry point for the Ktor application, where the server is configured and started.
Additionally, a Ktor project may include other directories or files based on the user requirements such as a database directory, custom libraries or modules, or additional configuration files.
Create your first Ktor application
In this section, we will create a custom Ktor application which returns book information to the user. We will continue with the above code (the starter code generated using the Ktor generator) to create the application. If you are interested in creating new applications, the ktor generator or IntelliJ IDEA Ultimatie IDE can be used.
- Open the downloaded project in IntelliJ IDEA community edition and wait for the Gradle sync completion.
- Create a package called
com.example.modelsby right clicking on thecom.exampledirectory, selectingNew → Packageand provide a valid name called models. - Create custom routes for create, list and delete books. Create a model for the Book which contains id, title, author, publications. For which, right click on the models folder, select
New → Kotlin class / fileand provide a valid name calledBook. Add the following code to it.
package com.example.models

import kotlinx.serialization.Serializable

@Serializable
data class Book (
    val id: Int,
    val title: String,
    val author: String,
    val publications: String
)
In this section, we will use MutableList type structure for adding books and simulating the data without using any databases.
- POST(“/book”) — Create a new book
To create a new book, add a new endpoint as a post request to theSerialization.ktfile. Add the following code to it.
package com.example.plugins

import com.example.models.Book
import io.ktor.serialization.kotlinx.json.*
import io.ktor.server.plugins.contentnegotiation.*
import io.ktor.server.response.*
import io.ktor.server.application.*
import io.ktor.server.request.*
import io.ktor.server.routing.*

fun Application.configureSerialization() {
    install(ContentNegotiation) {
        json()
    }
    val books = mutableListOf<Book>()
    routing {
        get("/json/kotlinx-serialization") {
                call.respond(mapOf("hello" to "world"))
            }
        post("/book") {
            val requestBody = call.receive<Book>()
            books.add(requestBody)
            call.respond(requestBody)
        }
    }
}- GET(“/books”) — Fetch the list of books
Open theSerialization.ktfile, add a new endpoint as a get request to retrieve all books. Follow the below code,
package com.example.plugins

import com.example.models.Book
import io.ktor.serialization.kotlinx.json.*
import io.ktor.server.plugins.contentnegotiation.*
import io.ktor.server.response.*
import io.ktor.server.application.*
import io.ktor.server.request.*
import io.ktor.server.routing.*

fun Application.configureSerialization() {
    install(ContentNegotiation) {
        json()
    }
    val books = mutableListOf<Book>()
    routing {
        get("/json/kotlinx-serialization") {
                call.respond(mapOf("hello" to "world"))
            }
        post("/book") {
            val requestBody = call.receive<Book>()
            books.add(requestBody)
            call.respond(requestBody)
        }

        get("/books") {
            call.respond(books)
        }
    }
}- To run the app, select the
Application.ktfile and press the play button (▶️). Open the postman and hit the urls (Eg: http://127.0.0.1:8080/book) with a json request body to see the output as below,


Creating service and routing
In the last section, we learned to create a basic get / post requests. In this section, we will create a service and route that preloads book information.
As a first step, comment on the lines you have added in the Serialization.kt file as below.
package com.example.plugins

import com.example.models.Book
import io.ktor.serialization.kotlinx.json.*
import io.ktor.server.plugins.contentnegotiation.*
import io.ktor.server.response.*
import io.ktor.server.application.*
import io.ktor.server.request.*
import io.ktor.server.routing.*

fun Application.configureSerialization() {
    install(ContentNegotiation) {
        json()
    }
//    val books = mutableListOf<Book>()
    routing {
        get("/json/kotlinx-serialization") {
                call.respond(mapOf("hello" to "world"))
            }
//        post("/book") {
//            val requestBody = call.receive<Book>()
//            books.add(requestBody)
//            call.respond(requestBody)
//        }
//
//        get("/books") {
//            call.respond(books)
//        }
    }
}
Create the service
- Create a package called
com.example.servicesand add a new Kotlin class / file namedBookService.ktin it. Add the following code to it.
package com.example.services

import com.example.models.Book;

class BookService {
    private val books = mutableListOf<Book>();
    init {
        books.add(Book(1,"C Programming Language","Kernighan Brian W","Pearson"))
        books.add(Book(2,"Eloquent JavaScript, 3rd Edition: A Modern Introduction to Programming","Marijn Haverbeke","No Starch Press"))
        books.add(Book(3,"Clean Code","Robert C Martin","Pearson"))
        books.add(Book(4,"Python Crash Course, 2nd Edition: A Hands-On, Project-Based Introduction to Programming","Eric Matthes","No Starch Press"))
        books.add(Book(5,"Effective Java","Joshua Bloch","Addison-Wesley Professional"))
        books.add(Book(6,"Introduction to Algorithms: CLRS","Thomson H.Cormen","PHI"))
    }

    public fun getBooks() : List<Book> = books

    public fun getBook(id: Int?) : Book? {
        return books.find { book -> book.id == id }
    }
    public fun addBook(book: Book) : Book? {
        books.add(book)
        return book
    }
    public fun deleteBook(id: Int?) {
        books.removeAll{ book -> book.id == id }
    }
}
Understand the code:
- Initialize a variable called
booksof typemutableListand prepopulate some values to the list in the constructor. getBooks()returns all the book information as a list.getBook()takesidas an argument and returns the specified book information.addBook()takesbookobject as an argument and adds it to the list.deleteBook()deletes thebookby the specifiedid.
Create the route
Create a package called com.example.routing and add a new Kotlin class / file named BookRoute.kt in it. Add the following code to it.
package com.example.routing

import com.example.models.Book
import com.example.services.BookService
import io.ktor.http.*
import io.ktor.server.application.*
import io.ktor.server.request.*
import io.ktor.server.response.*
import io.ktor.server.routing.*
import java.lang.Exception

@Suppress("unused")
fun Route.bookRoutes() {

    val bookService = BookService()

    route("books") {
        get {
            call.respond(bookService.getBooks())
        }
        get("/{id}") {
            val bookIdFromQuery = call.parameters["id"] ?: kotlin.run {
                throw Exception("Please provide a valid id")
            }
            val book = bookService.getBook(bookIdFromQuery?.toIntOrNull())
            if (book == null) {
                call.respond(HttpStatusCode.NotFound, "Book not found");
            } else {
                call.respond(book)
            }
        }
        post {
            val requestBody = call.receive<Book>()
            bookService.addBook(requestBody)
            call.respond(requestBody)
        }
        delete("/{id}") {
            val bookIdFromQuery = call.parameters["id"] ?: kotlin.run {
                throw Exception("Please provide a valid id")
            }
            bookService.deleteBook(bookIdFromQuery?.toIntOrNull())
            call.respond("Book is deleted")
        }
    }
}
Understand the code:
- Create an instance book service as
bookService. - Create a route
/bookswith get, post and delete endpoints. - The default get route will respond with book information by calling the
getBooks()method frombookService. The other get route takesidas a parameter and returns the specified book usinggetBook()method. - The post route will accept a book object as the request body content in a json format and will add it to the books list using
addBook()method. - The delete route takes
idas a parameter and deletes the specified book from the list.
Add the route
Open the Routing.kt file and add the following code to it.
package com.example.plugins

import com.example.routing.bookRoutes
import io.ktor.server.routing.*
import io.ktor.server.response.*
import io.ktor.server.application.*

fun Application.configureRouting() {
    routing {
        get("/") {
            call.respondText("Hello World!")
        }
        bookRoutes()
    }
}
Test the app
Now, we can test the app with get / post / delete routes. Select the Application.kt file and click on the play button(▶️) to run the app and use the postman to test the URLs.
Some of the testing screenshots are listed below,


Ktor client on Android
We have learned to create APIs using Ktor. In this section, we will create an android application which uses Ktor client to access APIs.
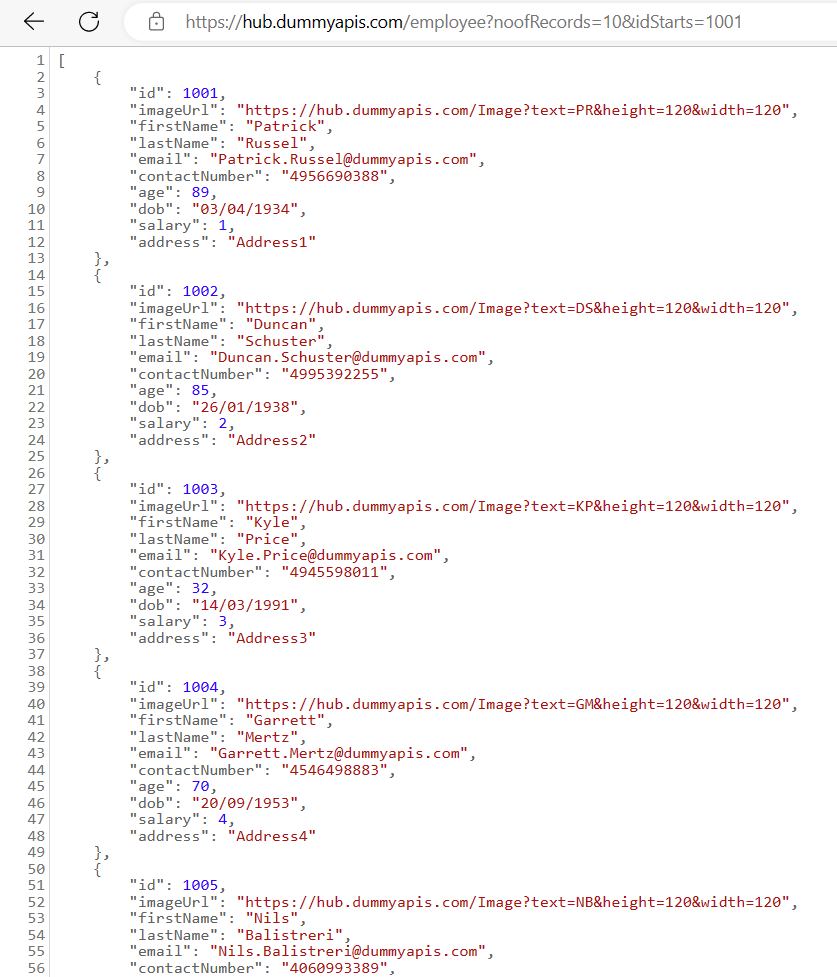
We will get data from a dummy site (https://hub.dummyapis.com/employee?noofRecords=10&idStarts=1001) and access it in the android app using the ktor android client.
Let’s create the app by the following steps.
- Create an android studio project by clicking on the New Project button.
- Click on next in the newly popped window and provide Name and Package Name in the window, click on Finish to complete the project setup.


- Add the following dependencies to the dependencies block in the app’s
build.gradlefile.
ext.ktor_version='2.3.0'

dependencies {
    ...
    implementation("io.ktor:ktor-client-android:${ktor_version}")
    implementation("io.ktor:ktor-client-core:${ktor_version}")
    implementation("io.ktor:ktor-client-cio:${ktor_version}")
    implementation("io.ktor:ktor-client-logging:${ktor_version}")
    implementation("io.ktor:ktor-client-content-negotiation:${ktor_version}")
    implementation("io.ktor:ktor-serialization-kotlinx-json:${ktor_version}")
    implementation("io.ktor:ktor-client-serialization:${ktor_version}")
    implementation 'org.jetbrains.kotlinx:kotlinx-serialization-json:1.0.1'
}- Add
kotlinx-serializationin plugins list on app’sbuild.gradlefile.
plugins {
    id 'com.android.application'
    id 'org.jetbrains.kotlin.android'
    id 'kotlinx-serialization'
}- Add internet permission to the
AndroidManifest.xmlfile.
<manifest xmlns:android="http://schemas.android.com/apk/res/android"
    xmlns:tools="http://schemas.android.com/tools">
    <uses-permission android:name="android.permission.INTERNET" />
    <application
        ...>
        ...
    </application>
</manifest>- Right click on the package folder (
com.vsoft.ktordemoapp). Select New → Kotlin Class/File option and create a file namedUser.kt. Add the following code to it.
package com.vsoft.ktordemoapp

import kotlinx.serialization.SerialName
import kotlinx.serialization.Serializable

@Serializable
data class User(
    @SerialName("id")
    val id: String,
    @SerialName("firstName")
    val firstName: String,
    @SerialName("lastName")
    val lastName: String,
    @SerialName("email")
    val email: String,
    @SerialName("contactNumber")
    val contactNumber: String,
    @SerialName("age")
    val age: Int,
    @SerialName("dob")
    val dob: String,
    @SerialName("salary")
    val salary: Float,
    @SerialName("address")
    val address: String,
)
The user data class is created as a serializable object which is used to convert the Json object into a kotlin object.
- Open
activity_main.xmland add anandroid:idfield to the textview as below.
    <TextView
        android:id="@+id/user_info"
        android:layout_width="wrap_content"
        android:layout_height="wrap_content"
        android:text="Hello World!"
        app:layout_constraintBottom_toBottomOf="parent"
        app:layout_constraintEnd_toEndOf="parent"
        app:layout_constraintStart_toStartOf="parent"
app:layout_constraintTop_toTopOf="parent" />- Open
MainActivity.ktfile and add the following code to it.
package com.vsoft.ktordemoapp

import android.os.Bundle
import android.widget.TextView
import androidx.appcompat.app.AppCompatActivity
import io.ktor.client.*
import io.ktor.client.call.*
import io.ktor.client.engine.android.*
import io.ktor.client.plugins.contentnegotiation.*
import io.ktor.client.plugins.logging.*
import io.ktor.client.request.*
import io.ktor.serialization.kotlinx.json.*
import kotlinx.coroutines.runBlocking
import kotlinx.serialization.json.Json


class MainActivity : AppCompatActivity() {
    override fun onCreate(savedInstanceState: Bundle?) {
        super.onCreate(savedInstanceState)
        setContentView(R.layout.activity_main)
        runBlocking { getData() }
    }

    suspend fun getData() {
        val client = HttpClient(Android) {
            install(ContentNegotiation) {
                json(Json {
                    prettyPrint = true
                    isLenient = true
                    ignoreUnknownKeys = true
                })
            }
            install(Logging) {
                level = LogLevel.ALL
            }
        }
        var users : Array<User> = client.get("https://hub.dummyapis.com/employee?noofRecords=10&idStarts=1001").body()
        var res = ""
        users?.map { user -> res += user?.id + ", " + user?.firstName + " " + user?.lastName + ", " + user?.age + ", " + user?.salary + "\n" }
         val info = findViewById<TextView>(R.id.user_info);
         info.text = res
         println(res)
    }
}
getData() is a suspend method which creates an android HTTPClient of ktor (client). It is installed with ContentNegotiation to deal with the content type of the request and response data. Logging module is used to list the logs while running the ktor client. The client.get() method is used to get data from the URL that we specified as an argument. The get() method returns the specified object if you piped it with body().
Test the app
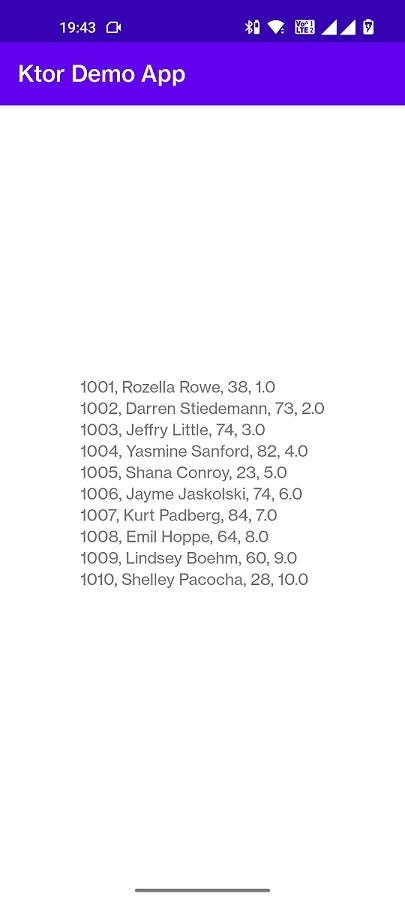
Click on the play button(▶️) to run the app.

You get an output as follows,
There you have it! Your first ktor android client app in Android studio :)
Thanks for reading this article.
Thanks Gowri M Bhatt for reviewing the content.
If you enjoyed this article, please click on the clap button 👏 and share to help others find it!
The full source code for this tutorial can be found here,
The article is also available on Dev.
Here are some useful links,